
Key-pair authentication
Snowflake supports using key pair authentication for enhanced authentication security as an alternative to basic authentication, such as username and password. This authentication method requires, as a minimum, a 2048-bit RSA key pair. You can generate the Privacy Enhanced Mail (PEM) private-public key pair using OpenSSL.
The public key is assigned to the Snowflake user who uses the Snowflake client to connect and authenticate to Snowflake.
Snowflake also supports rotating public keys in an effort to allow compliance with more robust security and governance postures.
Below is a summary of the more complete guide provided by Snowflake.
- Step 1 create private key part:
To generate an unencrypted (without passphrase) key, execute the following command in terminal:
openssl genrsa 2048 | openssl pkcs8 -topk8 -inform PEM -out rsa_key.p8 -nocrypt
To generate an encrypted (with passphrase) key, use the following command, which omits -nocrypt:
openssl genrsa 2048 | openssl pkcs8 -topk8 -v2 des3 -inform PEM -out rsa_key.p8
NOTE= For encrypted key you will be forced to specify a passphrase right once the command is entered.
The commands generate a private key in PEM format.
- Step 2 create public key part:
To generate the public key by referencing the private key execute the following command, which assumes the private key is stored in the file named rsa_key.p8:
openssl rsa -in rsa_key.p8 -pubout -out rsa_key.pub
- Step 3 attach the generated key to the database user:
Login to the Snowflake instance with your credentials, create a new SQL worksheet (query data) and execute SQL command:
GRANT MODIFY PROGRAMMATIC AUTHENTICATION METHODS ON USER my_service_user
TO ROLE my_service_owner_role;
where my_service_user is your username you going to use in Hackolade in login window and my_service_owner_role the role name you want this user to have (PUBLIC, ACCOUNTADMIN etc.)
Copy public key part from rsa_key.pub, everything in between:
-----BEGIN PUBLIC KEY-----
....
-----END PUBLIC KEY-----
and attach the public part to the user by executing the following SQL command:
ALTER USER my_service_user SET RSA_PUBLIC_KEY='copied_public_key';
where my_service_user is your username and copied_public_key is your copied public key.
In order to confirm the correctness of public key attachment execute following commands:
In Snowflake’s SQL worksheet:
DESC USER my_service_user
->> SELECT SUBSTR(
(SELECT "value" FROM $1
WHERE "property" = 'RSA_PUBLIC_KEY_FP'),
LEN('SHA256:') + 1) AS key;
In your OS terminal:
openssl rsa -pubin -in rsa_key.pub -outform DER | openssl dgst -sha256 -binary | openssl enc -base64
The output of the commands should be equal.
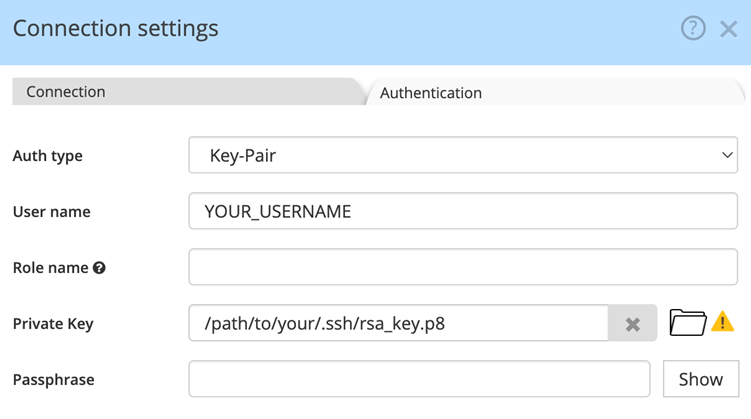
- Step 4 connect using Hackolade Studio:
In order to connect using Key-Pair in Hackolade in Snowflake’s connection window switch to Authentication tab, select Auth-type: Key-Pair, specify your User name, Role name, path to Private key and Passphrase in case if you are using it.
Click: Save → Connect and enjoy!